Device requirements
10 -15 front end controllers per CopperTree device (depending on the load of each front end)
Preparation Process
To prepare for your CopperTree service and ensure a quick and easy installation, please follow this guide to prepare your Andover Control System to talk to the CopperTree service. Please complete and return the Onboarding Packet provided by your CopperTree account representative.
How to Download Andover DMP Files
The following are instructions for downloading the Andover DMP file. This can be done before any prior setup:
1. Open Continuum Explorer
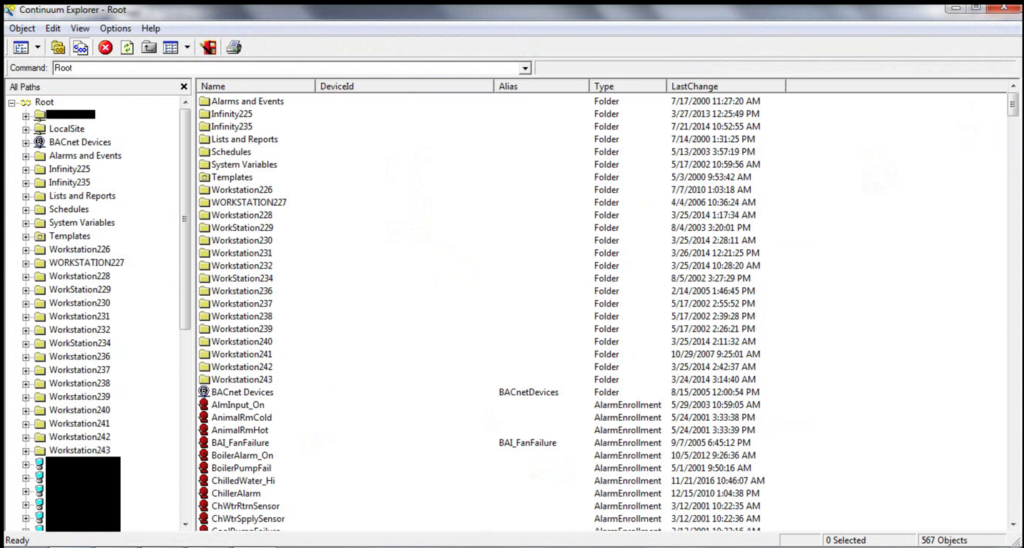
2. Expand Down the Network Folder showing each CX Controller (Red Icon)

3. Right Click on the CX that you wish to use as the master. Ensure that this CX has a scan time of less than 1 second. Go to “Send To”, then select “Text File…”. Select a location to save the file and wait for the task to complete before transferring or emailing it out.

4. Select where you want to save the file and select “save”.

5. Click “ok”.6. Right click on black status button next to the system clock.

7. Click properties.8. Wait for the status bar to complete.

9. Once complete, email the files to CT onboarding.
Enable Reads
- After mapping is completed, the infinity programs for each front-end controller must be installed.
- API GET call to obtain the files:
Headers:
Auth-ID: ApiID
Auth-Token: ApiToken
Path: https://api.buildpulse.com/api/v0/point/static_map_v2/download?frontend=controllername&send_to=emailaddress
A zip file will be sent to your email which will include the front-end programs for each controller, as well as the Infinity functions.
Load the front-end programs and Infinity functions for each front-end CX, NC I or II Then right click on the controller and “Send to controller”. You will be in contact with a CopperTree Representative to upload these files. This will trigger the 5-minute interval and begin populating the site with data.
There is one function that will need to be installed: BP_FE.fct – This function provides the ability for the CopperTree service to find and identify the controllers on the network.
Function Details
BP_FE.fct
This site master file will need to be added to just the master BCX or NetController II and CopperTree will need to be made aware of the IP address of that Net controller. CopperTree is happy to install this file for you if remote access can be provided using TeamViewer or something equivalent. Because the Strings already exist:
- Create an InfinityFunction on the master controller named BP_FE
- Copy the code below into the BP_FE function file on the controller.
BP_FE.fct Code
'The Following code is trademarked by CopperTree Analytics Inc. 2015
'Function Name: BP_FE
'VERSION 3.0
'Description: Following code is used to discover Front End and SubControllers on the Infinet Network

Object EnetCtrlr, InetCtrlr
Number OK
Number InetID

If CXName = "ALL" then

OK = OpenList("Controller", EnetCtrlr)
If OK = Failure then Print "{'error':'No Controllers Found'}"
Print "["
While GetObject(EnetCtrlr) is Success
 If EnetCtrlr NetworkId is between 1 and 190 and EnetCtrlr CommStatus > 0 then
Print "{'" ; EnetCtrlr Name ; "':{"
Print "'ComStatus':'" ; EnetCtrlr CommStatus ; "',"
Print "'NetworkID':'" ; EnetCtrlr NetworkId ; "',"
Print "'ControllerType':'" ; EnetCtrlr CntrlType ; "',"
Print "'IPAddress':'", EnetCtrlr IPAddress
Print "','Description':'" ; EnetCtrlr Description ; "'}},"
 Endif
Endwhile
Print "{'EOL':'EOL'}]"
CloseList(EnetCtrlr)

Else

OK = OpenList("InfinetCtlr", InetCtrlr, getname(CXName))
If OK = Failure then Print "{'error':'No Controllers Found'}"
Print "["
While GetObject(InetCtrlr) is Success
If InetCtrlr InfinetId > 0 then InetID =  256 minus InetCtrlr InfinetId Else InetID =  0
Print "{'" ; InetCtrlr Name ; "':{"
Print "'ComStatus':'" ; InetCtrlr CommStatus ; "',"
Print "'CntrlID':'" ; InetID ; "',"
Print "'Model':'" ; InetCtrlr CntrlType ; "',"
Print "','Description':'" ; InetCtrlr Description ; "'}},"
Endwhile
Print "{'EOL':'EOL'}]"
CloseList(InetCtrlr)

EndIf

'Clear Variables
CXName = ""
Class_Name = ""
WCUName = ""
CloseList(InetCtrlr)
CloseList(EnetCtrlr)
Upload DMP Files
1. Open Continuum Explorer
2. Expand Down the Network Folder showing each CX Controller (Red Icon)

3. Right-click on the master CX. Go to “Import Into”.

4. There should be 2 DMP files received for your master CX. Choose the one that doesn’t contain “static” first

6. Click OK to confirm

7. Right-click on the black status button next to the system clock.

8. Click properties.
9. Wait for the status bar to complete.
10. Repeat Steps 3-9 but import the file that contains “static” instead.

11. Under the Master CX, open the InfinityString folder, right-click “BP_Page”, goto “Send To”, then select “Controller”.

12. Under the Master CX, open the InfinityNumeric folder, select all files containing “BP”, right-click on them, go to “Send To”, then select “Controller”.

13. Under the Master CX, open the InfinityFunction folder, select all files containing “BP” EXCEPT files starting with “BP_IO”, right-click on them, and go to “Send To”, then select “Controller”.

14. Under the Master CX, open the InfinityProgram folder, select all files containing “BP”, right-click on them, go to “Send To”, then select “Controller”. Note the number of “BP” files under this folder

15. Under the Master CX, open the InfinitySystemVariable folder, and double-click the “Scan” file. Note the scan time value that is displayed.

16. Return to the IninityNumeric folder, right-click “BP_Max_Scan”, and go to “Properties”. For the Value, set it to the time value noted in step 15 and add 1. Ensure the other properties are as displayed in the image below.

17. Right click “BP_Min_Wait”, and go to “Properties”. For the Value, set it to the number of BP programs noted in step 14. Ensure the other properties are as displayed in the image below.

18. Return to the InfinityFunction folder, right-click on any files that contain the string “polling”, and go to “View”.

19. Monitor the CurrentLine column and check whether it does a full cycle. If so, there are no issues.

20. Return to the InfinityFunction folder, select all files containing “BP_IO”, right-click on them, go to “Send To”, then select “Controller”.

System Teach
The final step is to run a global teach, which can be done as follows:
- Select any of the master controllers
- Right Click on the controller and select edit
- Click Teach (lower left)
- Click the Global teach radio button
- Click Okay \ Yes
The system will let you know when the global teach is done.
Name Changes
If names change in the BAS after this setup process, please contact Customer Solutions, as it will affect the ability of the CopperConnector to read data.
